
I think the part kids enjoy most about this project is getting to pick out which fishy water they’re going to test. We took a trip to our local pet store and asked if we could take a few samples from their fish tanks for an experiment. They were very helpful and explained some of the differences we might find in the water samples. Originally, we had planned to test water from different fish but ended up with samples from a variety of species. Our twelve year old picked out samples from Black Mussel Snails, African Dwarf Frogs, and Red Zebra Cichlids. Once you have your water samples, the only other equipment you need is a School and Science Fair Test Kit from TestAssured. Then you will have everything you need for an easy science experiment that your kids will enjoy.

Supplies
The first thing you need to do is gather your supplies:
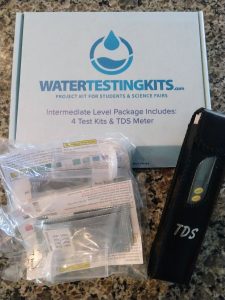
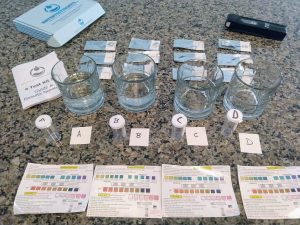
- Test Assured 4 Test Kit Set with TDS Meter
- 4 cups
- 3 fishy water samples
- 1 control sample
- Paper towels
Preparation
We brought out own plastic bags to the pet store to collect our samples. They gave us water samples from three different tanks and we also asked for a sample of clean water to use as our control. Once we got home, we transferred the water into cups. If you don’t want to put the fishy water in your drinking glasses, you could also just set the baggies inside cups so the samples are easier to work with. Now is a good time to label your vials and list the names of your fishy water samples in the results notebook.
Testing
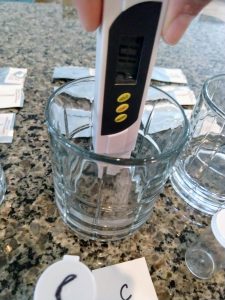
First, you will start with the test for total dissolved solids, using the TDS meter. Because the meter will not fit in the test vials, it is easier to complete this part of the experiment while your samples are still in the cups. To perform the TDS test, simply turn on the meter and submerge the prongs in the samples. Rinse the meter with clean water between each test. Record your results in the results notebook. Be sure to read the TDS meter carefully. High readings will be noted with “x10.”
After completing the TDS test, you will need to pour your samples into the vials you labeled. Do this over a sink and be sure to wipe up any spills, so you don’t contaminate the test strips.
Before you get started with the tests, now is a good time to make some visual observations. Take notes about how clear or cloudy your samples look. Are there any visible particles floating in any of the samples? These observations can be written in the “Notes” on the last page of the results notebook.
Now you’re ready to get started with the rest of the tests. It’s easiest to work with one sample at a time. Follow these instructions to complete the remaining tests.
Alkalinity/pH/Hardness Test
- Remove the test strip from the packet labeled, “ALK/pH/Hard”
- Pick up the strip on the end with no pads
- Dip the strip in the sample for one second and remove
- Hold the test strip level and wait 10 seconds
- Place the strip as shown in the picture and compare to the color chart for alkalinity, pH, and harness
- Record your results in the results notebook
Total Chlorine/Copper/Nitrate/Nitrite Test
- Remove the test strip from the packet labeled, “CL/CO/NA/NI”
- Pick up the strip on the end with no pads
- Dip the strip in the sample three times and remove – DO NOT SHAKE OFF EXCESS WATER
- Hold the test strip level for 2 seconds
- Place the strip as shown in the picture and compare to the color chart for chlorine and copper
- Wait 45 seconds before reading the results for nitrate and nitrite
- Record your results in the results notebook
Iron Test (Complete this test last)
- Remove one iron reagent tablet from the foil packet and place in test vial (the reagent could alter the results of other tests which is why the iron test is completed last)
- Place the cap on the test vial and shake for approximately one minute, until the tablet is completely dissolved
- Remove the test strip from the packet labeled, “Iron Test”
- Dip the strip in the sample for 2 seconds
- Shake the strip once and wait 60 seconds
- Place the strip as shown in the picture and compare to the color chart for iron
- Record your results in the results notebook
Repeat all three tests for each of your samples. When you are finished don’t forget to wash your hands with soap and water.
Results
Now that you have completed each of the tests on your four samples, it’s time to look at your results. Ask yourself these questions:
- How did the control sample differ from the fishy water samples?
- Did one of the fishy water samples differ more than the rest?
- What results did you find the most surprising?
Record your answers on the “Notes” page. If you are doing a science project, create a graph to show your results. You can also use clear tape to fix the test sticks to the color charts to display your results.