
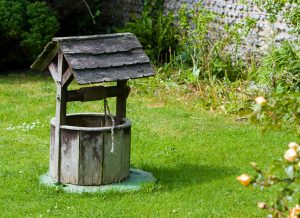
 Water quality is headline news these days. The water crisis in Flint, Michigan is still making the new four years later. Most recently, Chicago’s water quality has come into question. Unfortunately, if you get your water from a private well, there are no watch groups looking out for you. If your water isn’t coming from a public source, it is your responsibility to test well water on your own.
Private Water Statistics
As a well owner, you are accountable for making sure that your drinking water is safe. Many of the pollutants found in well water are colorless, odorless, and tasteless, making them hard to detect. Contaminants that occur naturally in the soil can seep into the water that supplies your well. Chemicals and fertilizers that are used in areas surrounding a well can also easily pollute the water. Here are some surprising statistics about private water from the Center for Disease Control.
| About 1 in 9 American residents get their drinking water from a private well. |
| About 1 in 5 sampled private wells were found to be contaminated at levels that could affect health. |
| From 1971 through 2008, the proportion of outbreaks associated with private water sources has increased. |
| Fifty-six percent of local health departments regulate, inspect, or license private drinking water in their community. |
Maintaining Your Well
In the past, requirements for wells were not as strict, so older wells are more susceptible to contamination. Newer wells are now required to include features such as grout seals, sanitary well caps, and extended casings to help protect against pollutants. Despite these extra precautions, new wells are still at risk for deterioration and should be inspected regularly to check for damage.
No matter how old your well is, part of responsible well ownership is performing regular maintenance. This will help to ensure that your well is operating properly and that the quality of your water has not been compromised. Regular well inspections for mechanical problems, cleanliness, and the presence of contaminants, will not only protect your water but it will also prolong the life of your well system.
Testing Well Water
You should test well water at least once a year. If you have a shallow well, less than 100 feet deep, it is recommended that you test at least twice a year. However, you may want to test more often if you have gastrointestinal issues or notice a change in odor, taste, or appearance of your water.
TestAssured makes a kit that is specifically designed to test well water. The Well Water Testing Kit includes eight tests for a complete water analysis. You’ll be able to identify the presence of chemicals, metals, and even bacteria like E. coli.
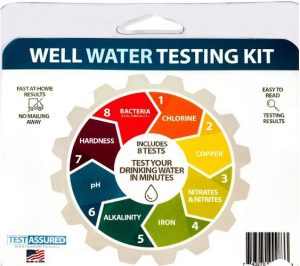
The tests are easy to perform, and you will have results within 10 minutes, with the exception of the bacteria test which must develop for 48 hours. Everything you need to perform the tests comes with the kit. There are no chemicals to mix and no samples to send to a lab.
Chlorine, Copper, Nitrates, and Nitrates
The first test you’ll perform with the TestAssured kit is for chlorine, copper, nitrates, and nitrates. Simply fill the large vial almost to the top with the water from your tap. Remove the test strip labeled CL/CO/NA/NI and swirl it in the water three times, then hold it level for two seconds. Align the strip with the corresponding color-coded chart to read your results.
Alkalinity, pH, and Hardness
Using the same water sample, the next test in the kit allows you to test well water for alkalinity, pH, and hardness. Take the strip marked AKL/pH/Hard and dip it in the vial for one second. Hold the strip level for ten seconds and then place it on the chart to read the color-coded results.
Iron Test
With the same sample, you can also test well water for iron. Add the iron reagent tablet to the vial, secure the cap, and shake until the tablet has completely dissolved. Dip the iron test strip into the vial for two seconds. Remove the strip and shake once to remove excess water. Wait 60 seconds and place on the color chart for results.
Bacteria Test
You will need another sample from your tap to test well water for bacteria. Unwrap the remaining sample vial and stand it upright on a level surface. Carefully twist off the cap without spilling the bacterial growth powder it contains. Fill the vial to the 5ml line, about a ½ inch below the top. Secure the cap and shake the sample for 20 seconds. Place the vial upright in a warm area (between 70-90°F) where it will not be disturbed. Wait 48 hours and then check the color of the liquid which indicates the results.
Test Results
Each test is calibrated to the EPA standards. Once you have your results, compare them to the EPA recommendations and guidelines for water quality. If you have any concerns about the safety of your water, contact your local health department immediately.
Concerned about quality of shared private well